Sunday, 31 December 2023

How to Install and Download Blackmagic DaVinci Resolve 18 Step by Step With Pictures Tutorials


There are only a few good professional video editing software programs available for PC. Adobe Premiere Pro, Sony Vegas, and DaVinci Resolve. There are a couple of other programs, but these three are the programs used by professionals around the world. Out of three, DaVinci Resolve is a free software program that is developed by Blackmagic Design. It is good to edit videos and make color corrections to your videos without compromising on the quality of your videos. In this guide, we show you 

how to use DaVinci Resolve on Windows PC.

  1. Go to Blackmagic Design official website
  2. Navigate to the Davinci Resolve page
  3. Click DaVinci Resolve Free Download Now
  4. Click on Windows under the version you need
  5. Fill in the details to register and download
  6. Install on your PC and use

Let’s get into the details of installing and using DaVinci Resolve on a Windows PC.

You need to download the latest version of DaVinci Resolve from the Blackmagic Design website. Open a web browser on your Windows PC and go to Blackmagic Design’s official website. You will find DaVinci Resolve under its products. Click on it. It will take you to the DaVinci Resolve page. Click on the DAVINCI RESOLVE Free Download Now button.

Download DaVinci Resolve

It will show you two variants of DaVinci Resolve. DaVinci Resolve and DaVinci Resolve Studio. Click on the Windows button under the DaVinci Resolve if you want to use a free version. If you have a Blackmagic camera and want to use a premium version, click on Windows under DaVinci Resolve Studio.

Choose DaVinci Resolve Version

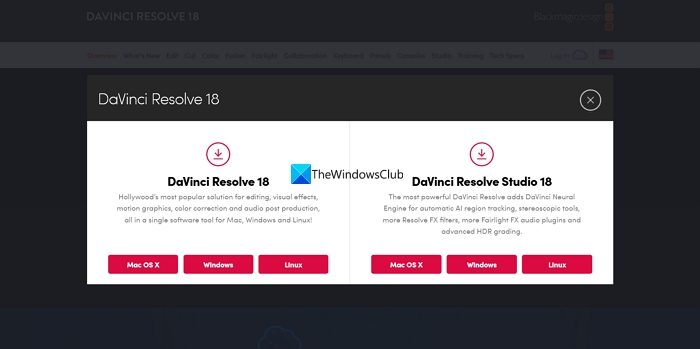
Both will take you to the Your Details page. Fill in the necessary details and then click on Register & Download. If you have opted for DaVinci Resolve, you will find the Download only button and can download without filling in any details.

Fill details and download DaVinci Resolve

It will download the DaVinci Resolve zipped file onto your PC. Locate it and extract the contents. Then, run the DaVinci Resolve installer file. Click on Install.

Install DaVinci Resolve on Windows

It will install the DaVinci Resolve on your PC and asks you to restart your PC to complete the installation. After the restart, you can use DaVinci Resolve to edit videos by importing them. If you have downloaded and installed DaVinci Resolve Studio, you have to enter the product key you get after the purchase or the key you get with the Blackmagic camera.

To use DaVinci Resolve, open DaVinci Resolve on your PC. You will see a features page followed by the setup like a folder to export videos, etc. Click on Continue to start using the DaVinci Resolve.

DaVinci Resolve Set up

To import videos to the Media Pool and edit them, click on File in the Menu bar and hover over Import, and select Media. Or you can use the Win+I keyboard shortcut.

DaVinci Resolve on Windows

The files will be added to the Media Pool. Drag them on to the timeline to cut your videos and arrange them in a sequence.

DaVinci Resolve cut timeline

To cut the videos you can use the Scissor icon above the timeline.

Under the timeline, you will find different tabs related to doing different tasks. They are:

  • Media: In the media tab, all the media you have imported into DaVinci Resolve is available. You can keep or remove them if they are of no use.
  • Cut: In the Cut tab, you will see the timeline to cut videos using the Scissor icon or use the Ctrl+X shortcut on your keyboard. All the media, you have imported are cut here one by one.
  • Edit: In the Edit tab, you will find the video and audio tracks which you can edit and sequence all the media you have imported to make coherence.
  • Fusion: The Fusion tab is where you can apply various effects to the videos and timeline or the sequence you have created using the media.
  • Color: The Color tab is where you do all the color corrections and make your videos look more brighter and colorful.
  • Fairlight: In the Fairlight tab, you can edit the audio track as you want and apply effects, level the sound, or do other things with the audio track. Fairlight is a dedicated audio-editing tab on DaVinci Resolve.
  • Deliver: The Deliver tab is where you export the sequence or timeline you have edited on DaVinci Resolve. Here, you select the kind of output you want from the available options and export the final video.

This is how you can install and use DaVinci Resolve on your PC. You can download DaVinci Resolve directly from Blackmagic Design.

Can DaVinci Resolve be used on Windows?

Yes, DaVinci Resolve can be used on Windows. It is available for Windows, Mac OS X, and Linux platforms that you can use to edit videos and create content for your YouTube channel or others. It is a free-to-use video editing program, unlike other professional video editors.

64BIT FULL SETUP

PASSWORD 123


must turn off antivirus on windows and turn it back on when it finish

dont  Forget To Download 7ZIP  

Enjoy!!!!!!!!

Share:

How to Install and Download Office 365 Pro Plus Online installar Step by Step With Pictures Tutorials

Sign in to download Office for PC

  1. Go to https://portal.office.com and if you're not already signed in, select Sign in.

  2. Sign in with the account you associated with this version of Office.

  3. After signing in, follow the steps:

    1. From the Office 365 home page select Install Office apps

      Screenshot of Office.com if signing in with a work or school account
    2. Select Office 365 apps to begin the installation.

    Note: The 64-bit version is installed by default unless Office detects you already have a 32-bit version of Office (or a stand-alone Office app such as Project or Visio) installed. In this case, the 32-bit version of Office will be installed instead.

    To change from a 32-bit version to a 64-bit version or vice versa, you need to uninstall Office first (including any stand-alone Office apps you have such as Project of Visio). Once the uninstall is complete, sign in again and select Other install options, choose the language and version you want (64 or 32-bit), and then select Install

  4. This completes the download of Office to your device. To complete the installation, follow the prompts in the "Install Office" section below.

Install Office

  1. Depending on your browser, select Run (in Edge or Internet Explorer), Setup (in Chrome), or Save File (in Firefox).

    If you see the User Account Control prompt that says, Do you want to allow this app to make changes to your device? select Yes.

    The install begins.

    Shows the progress dialog box that appears when Office is installing

  2. Your install is finished when you see the phrase, "You're all set! Office is installed now" and an animation plays to show you where to find Office applications on your computer. Select Close.

    Office is installed now. Select Close

Activate Office

  1. To open an Office app, select the Start button (lower-left corner of your screen) and type the name of an Office app, like Word.

    If you have Windows 8.1 or 8.0, type the name of an Office app on the Start screen.

  2. To open the Office app, select its icon in the search results.

  3. When the Office app opens, accept the license agreement. Office is activated and ready to use.

Note: The Activation Wizard appears if Office has trouble activating. Complete the steps in the wizard to finish activating Office.


Install Office for Mac

  1. Once the download has completed, open Finder, go to Downloads, and double-click Microsoft Office installer.pkg file (the name might vary slightly).

    The Downloads icon on the Dock shows the Office 365 installer package

    Tip: If you see an error that says the Microsoft Office installer.pkg can't be opened because it is from an unidentified developer, wait 10 seconds and move the downloaded file to your desktop. Hold Control + click the file to launch the installer.

  2. On the first installation screen, select Continue to begin the installation process.

    First Mac 2016 installation screen with "Continue" highlighted
  3. Review the software license agreement, and then click Continue.

  4. Select Agree to agree to the terms of the software license agreement.

  5. Choose how you want to install Office and click Continue.

  6. Review the disk space requirements or change your install location, and then click Install.

    Note: If you want to only install specific Office apps and not the entire suite, click the Customize button and uncheck the programs you don't want.

  7. Enter your Mac login password, if prompted, and then click Install Software. (This is the password that you use to log in to your Mac.)

    Enter your admin password to begin installing
  8. The software begins to install. Click Close when the installation is finished.

    Shows the final page of the installation process, indicating that the installation was successful.

Launch an Office for Mac app and start the activation process

  1. Click the Launchpad icon in the Dock to display all of your apps.

    Shows the Launchpad button in the Dock
  2. Click the Microsoft Word icon in the Launchpad.

    Shows the Microsoft Word icon in a partial view of the Launchpad
  3. The What's New window opens automatically when you launch Word. Click Get Started to start activating.

    Start activating Word 2016 for Mac

32/64 BIT


THANKS AND ENJOY !!!!!!!

Share: