
Windows 7 Installation Step by Step with Pictures
Windows 7 Operating System is the most familiar one. Simple to Install software s and user-friendly for beginners. First booting your pen drive with operating system after that will follow below steps
Step1: Booting Files:

First will Turn on your PC and press ‘F2’ button or depends upon your system. There will show some option to boot through USB or CD/DVD (Pendrive). Select that option Windows will start loading files.
Step2: Prepare to Install Now :

After that, you will get the Windows Setup Window. This is the part for select language ‘English’ and clicks on ‘Next’ then click on ‘Install now’.
Step3: Click on the Custom option

There will be a license agreement check on ‘I ACCEPT‘ and proceed to Next. After that two options are showing ‘Upgrade’ and ‘Custom’. Select ‘Upgrade’
Step4: Select the Drive then If you need Format the Drive:

After that, you will do partitioning of your drive be careful, and choose a partition. If you need a new partition to click on ‘New’ button and choose them then will you create a new drive
Step5: After Format Drive Select the Drive:

After created new drive then select the drive which you want to install windows. Click on ‘Format’. It will erase all the previous data click on ‘Next’ to proceed.
Step6: Click on Next

After clicking on Next it will loading files, Initializing files.
Step7: Create Username and Password

In this step create a username and PC name as well as a set password of your PC.
Step8: If you ask Product ID then Enter

In case not enter starting of your installation the will ask in this step Product ID
Step 9: Click on Next:
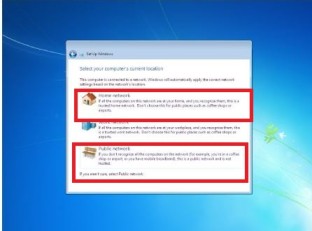
After entering product id the will ask Network options first you will check

0 comments:
Post a Comment