Friday, 13 January 2023

How To Install Clean Windows 10 With Pictures Tutorials

 1. Click Here to download this tool and run it. When asked, accept Microsoft software license terms and then choose “Create installation media (USB flash drive, DVD, or ISO file) for another PC” before you click Next. 

2. The wizard will ask you to select Language, Windows Edition and Architecture. You can accept the recommended options or make your own choice. Then click Next.


3. In this step, you need to choose either to create a Windows 10 install USB or to extract the ISO file (you will need to burn it to a DVD later by yourself). It’s up to you. Here take the former one for an example. Just prepare a USB drive that is large enough (at least 8GB) and click Next.


4. Select the removable drive from the list when asked, and make sure you've copied any files you want to keep off it because it will be formatted during the process of creating Windows installation media. Click Next to continue.

5. The tool will start downloading Windows 10 as well as any available updates to your USB drive and make it bootable, which allows you to install Windows 10 later.

6. When the process is successful, you'll see a message that reads "Your USB flash drive is ready". At this time, click Finish to exit.Step 3: Install Windows 10 on SSD/HDD

*Do this on the target computer.

With Windows 10 installation media, how to install Windows 10 from USB? Please follow the detailed instructions below:

1. Insert the drive into the PC or laptop onto which you want to install Windows 10. Then turn on the computer and it should boot from the flash drive. If not, enter the BIOS and ensure the computer is set to boot from the USB drive (using the arrow keys to put it in the first place in the boot sequence).

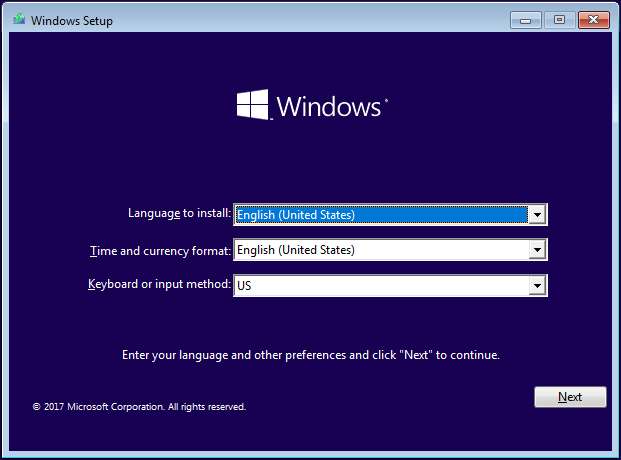
2. When the computer does boot from the USB drive, you'll see a Windows logo, followed by a language selection. Confirm the language to install, time and currency format, and keyboard or input method. Then click Next.


3. Click Install now.


4. You will be asked to enter the license key, do as you are required. (You can also click “I don’t have a product key” to skip and choose the Windows 10 edition you want. By ignoring, you will be required to enter the license key later.)


5. Accept the license terms and click Next.


6. Here you need to make your own choice. We just take the latter one for example.

  • [Upgrade: Install Windows and keep files, settings, and applications]: This option will keep all your files, settings and applications saved in the system partition there. However, note that it is only available when a supported version of Windows is already running on the computer.
  • [Custom: Install Windows only (advanced)]: This will remove all your files, settings and applications and give you a clean install of Windows 10. Choose this option if you want to wipe your hard drive and make a fresh start, or you are installing Windows 10 on a new hard drive. We recommend backing up your files before you continue.


7. What you'll see in the next screen depends. But overall, you need to choose a location and click Next to install Windows 10.

Situation A: If you only have a new drive connected, you will see a Drive 0 Unallocated Space listed there. To install Windows 10 on a new hard drive, just select it and click Next to install Windows 10 on new hard drive.

Situation B: If you have got more than one hard drive connected to your PC, you'll be shown a screen with several drives called “Drive 0”, “Drive 1” and so on. And if a drive is already partitioned, you will see “Drive 0 Partition 1”, “Drive 0 Partition 2”, “Drive 0 Unallocated Space”, and so on.

In Situation B, you have 2 options, that are to install Windows 10 on the original system partition or to delete all partitions (by selecting each one and clicking the Delete option) to go back to Situation A to install Windows 10. This will erase all data on the partitions, so double-check that you're deleting partitions from the correct drive and you're absolutely sure you've already backed up everything you need.

8. Windows will then start the installation process. Mostly, the installation is automatic, but keep an eye on it and answer any questions you're asked.

Knowing how to install Windows 10 from USB, do you know how to install Windows 10 from CD/DVD? In fact, the process is just the same. Connect the CD/DVD to your PC and the computer should boot from it. The following operations are just the same.

Step 4: Sign in Windows 10

*Do this on the target computer.

It's well worth reading through the initial questions and options, since opting for the defaults means a fair amount of personal data will be sent to Microsoft's servers for convenience. For example, data is stored so Cortana knows about you and can be more helpful. This isn't sinister, but some people think different and they would refuse.

When you finally get to the Windows 10 desktop, connect to the network and allow a bit of time for Windows 10 searching for drivers for your hardware. The screen resolution may be wrong but will be all right after drive update. And you will have to manually transfer your files and install the apps once Windows 10 is installed.

GOOD LUCK


Share:

Steps To Create MySQL Database Using XAMPP With Pictures Tutorials

Tutorials

 STEP 1- Navigate to XAMPP in your system or simply launch it by clicking the XAMPP


YOU HAVE TO DOWNLOAD XAMPP SERVER 


STEP 2- Click on the "Start" button corresponding to Apache and MySQL modules. Once it starts working, the user can see the following screen:


STEP 3- Now click on the "Admin" button corresponding to the MySQL module. This automatically redirects the user to a web browser to the following address-

http://localhost/phpmyadmin

STEP 4- One can see a number of tabs such as Database, SQL, User Accounts, Export, Import, Settings, etc. Click on the "Database" tab. Here you can see the Create option. Choose an appropriate name for the input field titled Database name. Things to keep in mind while selecting the name for the database are-

  • The number of characters used should be equal to or less than 64.
  • The name should comprise of letters, numbers and underscore.
  • The DB name should not start with a number.
  • It should be relevant to the topic for which it is being created.

Make sure the database is successfully created.

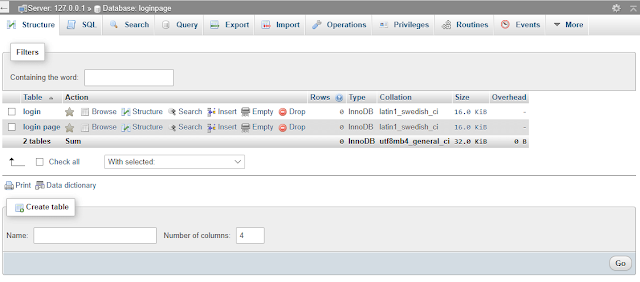
STEP 5- It is very important to create tables in order to store the information in a systematic manner. In this step, we will build tables for the created database. In the created Database (Login page in this case), click on the 'Structure' tab. Towards the end of the tables list, the user will see a 'Create Table' option. Fill the input fields titled "Name" and "Number of Columns" and hit the 'Go' button.

STEP 6- Now, we have to initialize our columns based on their type. Enter the names for each of your columns, select the type, and the maximum length allowed for the input field. Click on "Save" in the bottom right corner. The table with the initialized columns has been created. You can create any number of tables for your database.

In order to limit the audience in terms of users allowed to modify and read the data, you can set a password to the created database. In terms of default settings, the host's username is "root" and there no password is provided. Follow the given steps to increase the privacy of your database:

STEP 1- Click on the "User Accounts" tab at the top of the page.

STEP 2- Press "Edit Privileges" under "Actions" option corresponding the Username= "root" and Hostname = "localhost"


STEP 3- Click on the tab 'Change password' and type your password in the provided field. Retype the password to confirm it and then finally click on the "Go." Now the password has been set.


Share:

Example of Basic Text Box HTML

HTML CODE

BASIC TEXT BOX

<form action="//www.html.am/html-codes/textboxes/submitted.cfm">

<textarea name="myTextBox" cols="50" rows="5">

Enter some text...

</textarea>

<br />

<input type="submit" />

</form>

TEXT BOX COLOUR 

<form action="//www.html.am/html-codes/textboxes/submitted.cfm">

<textarea name="myTextBox" cols="50" rows="5" style="background-color:#FCF5D8;color:#AD8C08;">

Enter some text...

</textarea>

<br />

<input type="submit" />

</form>

TEXT BOX BORDERS

<form action="//www.html.am/html-codes/textboxes/submitted.cfm">
<textarea name="myTextBox" cols="50" rows="5" style="background-color:#FCF5D8;color:#AD8C08;border:5px double #AD8C08;">
Enter some text...
</textarea>
<br />
<input type="submit" />
</form>
Share:

Three Column Layout, Two Right Menus HTML

 HTMLCODE

<!DOCTYPE html>

<!-- Template by html.am -->
<html>
	<head>
		<meta http-equiv="Content-Type" content="text/html; charset=UTF-8">
		<title>3 Column, Right Menus</title>
		<style type="text/css">
		
			body{
				margin:0;
				padding:0;
				font-family: Sans-Serif;
				line-height: 1.5em;
			}
			
			#header {
				background: #BCCE98;
				height: 100px;
			}
			
			#header h1 {
				margin: 0;
				padding-top: 15px;
			}
			
			#mainwrapper {
				overflow: hidden;
			}
			
			#contentwrapper{
				float: left;
				width: 100%;
			}
			
			#content {
				margin-right: 460px; /* Width of '#rightmenu' and '#leftmenu' combined. */
				padding-bottom: 10010px;
				margin-bottom: -10000px;
			}
			
			#leftmenu {
				float: left;
				width: 250px;
				margin-left: -460px; /* Width of '#rightmenu' and '#leftmenu' combined. */
				padding-bottom: 10010px;
				margin-bottom: -10000px;
				background: #F7FDEB;
			}
			
			#rightmenu {
				float: left;
				width: 210px;
				margin-left: -210px;
				padding-bottom: 10010px;
				margin-bottom: -10000px;
				background: #DAE9BC;
			}
			
			#footer{
				clear: left;
				width: 100%;
				background: #BCCE98;
				text-align: center;
				padding: 5px 0;
			}
			
			.innertube{
				margin: 15px; /* Padding for content */
				margin-top: 0;
			}
		
		
			p {
				color: #555;
			}
	
			nav ul {
				list-style-type: none;
				margin: 0;
				padding: 0;
			}
			
			nav ul a {
				color: darkgreen;
				text-decoration: none;
			}
			
		</style>
		
		<script type="text/javascript">
			/* =============================
			This script generates sample text for the body content. 
			You can remove this script and any reference to it. 
			 ============================= */
			var bodyText=["The smaller your reality, the more convinced you are that you know everything.", "If the facts don't fit the theory, change the facts.", "The past has no power over the present moment.", "This, too, will pass.", "</p><p>You will not be punished for your anger, you will be punished by your anger.", "Peace comes from within. Do not seek it without.", "<h3>Heading</h3><p>The most important moment of your life is now. The most important person in your life is the one you are with now, and the most important activity in your life is the one you are involved with now."]
			function generateText(sentenceCount){
				for (var i=0; i<sentenceCount; i++)
				document.write(bodyText[Math.floor(Math.random()*7)]+" ")
			}
		</script>	
	</head>
	
	<body>
			<header id="header">
				<div class="innertube">
					<h1>Header...</h1>
				</div>
			</header>
		<div id="mainwrapper">
		
			<div id="contentwrapper">
				<div id="content">
					<div class="innertube">
						<h1>Heading</h1>
						<p><script>generateText(15)</script></p></div>
				</div>
			</div>
			
			<nav id="leftmenu">
				<div class="innertube">
					<p><script type="text/javascript">generateText(5)</script></p>
				</div>
			</nav>
			
			<nav id="rightmenu">
				<div class="innertube">
					<h3>Right heading</h3>
					<ul>
						<li><a href="#">Link 1</a></li>
						<li><a href="#">Link 2</a></li>
						<li><a href="#">Link 3</a></li>
						<li><a href="#">Link 4</a></li>
						<li><a href="#">Link 5</a></li>
					</ul>
					<h3>Right heading</h3>
					<ul>
						<li><a href="#">Link 1</a></li>
						<li><a href="#">Link 2</a></li>
						<li><a href="#">Link 3</a></li>
						<li><a href="#">Link 4</a></li>
						<li><a href="#">Link 5</a></li>
					</ul>
					<h3>Right heading</h3>
					<ul>
						<li><a href="#">Link 1</a></li>
						<li><a href="#">Link 2</a></li>
						<li><a href="#">Link 3</a></li>
						<li><a href="#">Link 4</a></li>
						<li><a href="#">Link 5</a></li>
					</ul>
				</div>
			</nav>
		</div>
			<footer id="footer">
				<div class="innertube">
					<p>Footer...</p>
				</div>
			</footer>
	
	</body>

</html>
Share: