Monday, 23 January 2023

How to Install & Config The Windows Server 2022 Step by Step With Pictures Tutorials


Windows Server 2022 Installation Overview

Windows Server 2022 is based on Windows Server 2019 and was announced in 2021 with a ten-year support cycle. It's designed for small-to-medium-sized businesses and offers increased stability and performance. 

If you're looking to upgrade your IT infrastructure to be more reliable and efficient, then the time has never been better!

Some of the new features in Windows Server 2022 include the following:

  • AMD CPUs now support nested virtualization.
  • As the default web browser, Microsoft Edge is bundled with the system.
  • Improved security features to increase protection against all sorts of attacks, such as malware, privacy, and network attacks.
  • Enhancements to UDP/TCP performance.
  • Hybrid capabilities in Azure.

Who should install Windows Server 2022?

The latest version of Microsoft Windows Server is the perfect fit for businesses and professionals who want to take their job more seriously, or educational institutions can benefit from Windows Server 2022.

It also works well with other professionals like engineers and educational organizations, giving them more uses than before! Windows Server 2022 offers peace of mind for safety-conscious employers in charge of running a business where you want people's data secure.

Specifically, there has been an increased focus on the cloud, a foundation for data centers that provide our increasingly mobile world with technology-based communications. If you need support for cloud functionality, Windows Server 2022 is the perfect server OS to get invested in.

In conclusion, with the recent release of Windows Server 2022, businesses and organizations can now take their jobs seriously. This new version is tailored more specifically towards professionals in data centers who provide cloud services worldwide!

Why Install Windows Server 2022?

Answer: Windows Server 2022 has New, better, more efficient features

Windows Server 2022 New Features

Let’s look at the new features included in Windows Server 2022 release. Refer to the official Microsoft documentation for complete details on new features and enhancements.

  • Advanced multi-layer security in Server 2022 security module provides the comprehensive protection that servers need in today’s modern tech world.
  • Server 2022 is built on three key pillars: Advanced protection, simplified security, and preventative defense.
  • TLS 1.3 and HTTPS are enabled by default on Windows Server 2022. Typically, this protects clients’ data connecting to the server and eliminates obsolete cryptographic algorithms. It also enhances security over older versions and aims to encrypt as much of the handshake as possible.
  • DNS Client in Server 2022 now supports DNS-over-HTTPS (DoH) which encrypts DNS queries using the HTTPS protocol.
  • New improvements to Windows Admin Center to manage Server 2022 include capabilities to both reports on the current state of the Secured-core features.
  • HotPatching – A new way to install updates on new Windows Server Azure Edition virtual machines (VMs) that doesn’t require a reboot after installation
  • Several platform improvements for Windows Containers, including application compatibility and the Windows Container experience with Kubernetes.
  • Microsoft Edge is included with Windows Server 2022, replacing Internet Explorer.

How to install Windows Server 2022

Installing Windows Server 2022 can be a major change for your organization. 

Note: To ensure you have the necessary tools and resources, carefully read through this guide. You’ll learn how installing a new Windows Server operating system can affect all areas of IT in an effective way that’ll meet current needs while preparing for future innovations. 

Let’s discuss it in detail here below!

Part 1: Windows Server 2022 Hardware Requirements

Before we dive into the installation, let’s look at the minimum hardware/system requirements for installing Windows Server 2022 operating system.

  • Processor: 1.4 GHz 64-bit processor Compatible with x64 instruction set. Supports NX and DEP, CMPXCHG16b, LAHF/SAHF, and prefetch.
  • Memory/RAM: 512 MB (2GB for Server with Desktop Experience installation option). ECC (Error Correcting Code) type or similar technology, for physical host deployments
  • Disk Space: Minimum 32 GB (Windows Server 2022 using the Server Core installation option).
  • Network Requirements: An Ethernet adapter capable of at least 1 gigabit per second throughput. Compliant with the PCI Express architecture specification
  • Additional requirements: UEFI 2.3.1c-based system and firmware that supports secure boot; Trusted Platform Module; Graphics device and monitor capable of Super VGA (1024 x 768) or higher-resolution.

Part 2: Windows Server 2022 Installation Options

Again, when you install Windows Server 2022, what options do you have? 

Answer: You get two installation options to install Windows Server 2022.

Choose the install option that servers you need based on the information provided below.

  • Server Core – In many cases, this is the recommended installation option. Server Core is a smaller installation that includes the core components of Windows Server and supports all server roles. However, it doesn’t include a local graphical user interface (GUI). It’s mostly used for remotely managed deployments usually through PowerShell, Windows Admin Center, or other server management tools.
  • Server with Desktop Experience – If you want a complete installation, including a full GUI, this is your option. This option has a larger footprint than server core. It is the most preferred option by organizations.

Part 3: Step-By-Step Guide to Windows Server 2022 Installation

  • An overview of Windows Server 2022 installation 
  • Who should install Windows Server 2022
  • Windows Server 2022 new features 
  • How to install Windows Server 2022
  • How to install Server 2022 Updates
  • And many more!

Let’s dive in!

Step 1. Download the Windows Server 2022 ISO

The first and most crucial step in installing the new Windows Server 2022 is acquiring the installer file. This file is an ISO that contains the identical content of an optical disc. This file will allow you to create a boot media and then install your new server operating system.

  1. To get the Windows Server 2022 ISO image, you first need to sign up at Microsoft’s official Windows Insider page. Navigate to this webpage in any browser of your choice.
  2. Click on Windows Server 2022, and then select Download the ISO from the available options. Click Continue.

3. You’ll be required to fill in your information to be eligible for downloading the Windows Server 2022 ISO image. Make sure to enter your information accurately, as verification may be required later. When done, click Continue.


Choose the language you want to use when installing Windows Server 2022. You can currently choose from 8 different languages, including English, Spanish and Japanese. Once selected, click on the Download button.


  1. The download may take up to a couple of hours to complete. Ensure you don't disconnect your computer from power or the internet while the process is happening, or else it may be lost!

Step 2. Make the bootable ISO image for Windows Server 2022

After successfully downloading the Windows Server 2022 ISO file, it's time to prepare your boot environment. You can either install Windows Server 2022 on a physical host or virtual machine using an ISO image.

Follow one of the relevant guides by Microsoft to create your bootable media:

If you have access to MSDN (via Visual Studio Subscriptions and Benefits), you have the option to download Windows Server 2022 ISO from there. All you have to do is generate a new key by clicking Get Key and using this for activation of your installation of Windows Server 2022.

Step 3. Install Windows Server 2022

With the boot media ready, you can now proceed to install Windows Server 2022. As it is an extensive operating system with many editions available for purchase or download, your company may want to choose which edition to install before beginning the process and installing the desired edition properly!

You can pick from the following editions when using the latest Windows Server 2022:

As you may know, each version has different strengths, features, and prices. When thinking about licensing, keep in mind that all editions of Windows Server 2022 require a legal license in order to use. Now, let’s get on with the installation process. Continue with the approach you prefer between Server Core and Desktop Experience.

Step 3.1 Installing Windows Server 2022 (Server Core)

If you want to install Windows Server 2022 using Server Core, follow the instructions in this section. Server Core is a minimal installation method that uses a Command Prompt to handle commands on the server. It’s suitable for smaller businesses that need to save space and resources.

  1. Power on your physical or virtual machine using the boot media you created. You’ll be asked to press any key when it asks for an input, which is used as a launching point for installing Microsoft’s newest server operating system.


2. Next, you’ll need to select a language of your choice, as well as keyboard layout preference and your time/currency settings. Click "Next" in the window that pops up, and let's get started!


Click on the 
Install now button to initiate the installation process for Windows Server 2022. This will begin the installation of the Server Core edition of Microsoft's server platform.


In the next window, choose the Windows Server 2022 server option you want to install with Server Core that gives you access and use for some of Microsoft's powerful command-line tools. Click Next to proceed.


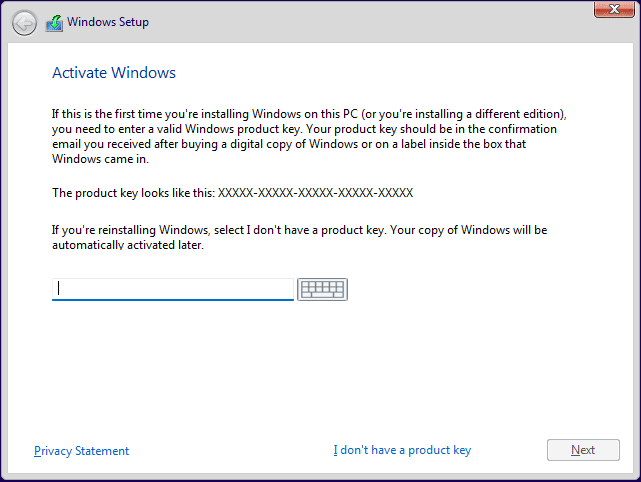
Next, you need to read the License terms and agree to them for the installation process to continue by checking the “I accept all license agreements” box.


When installing, select “Custom: Install Windows Server Operating System only” if you're installing the OS on a fresh server. Otherwise, if upgrading from a previous version of Windows Server, choose the “Upgrade: Install Microsoft Server Operating System and keep files, settings, and applications” option


Select a partition to install Windows Server onto. You can optionally create a new partition or use the entire drive size. When done selecting the designated OS partition, proceed by clicking “Next.”


The installer will begin installing the necessary system files. You’ll see when it’s completed, and the system reboots automatically.


After a successful installation, the system should immediately reboot and prompt you for an administrator password. Enter this information before re-entering it once again to verify it, and then continue.


Next, you’ll be taken directly into Microsoft’s PowerShell interface, where you can begin managing your newly installed Windows Server 2022 operating system via the Server Core interface


Step 3.2 Installing Windows Server 2022 (Desktop Experience)

If you want to install Windows Server 2022 using Desktop Experience, follow the instructions in this section. The Desktop Experience installation has a dedicated GUI (Graphical User Interface) similar to a regular Windows operating system, making server management easier.

  1. Follow the same instructions as the Server Core installation until your system restarts after installing the operating system. Also, make sure to select Desktop Experience when choosing your Windows Server 2022 version.
  2. After your system restarts, you’ll be greeted with a graphical interface. You’ll be prompted to create an administrator password before you can proceed. Click Finish when you’re done

The login screen will appear when you press Ctrl + Alt + Del. Enter the password set in the previous step to continue accessing your server.

You should see the Server Manager launch by default. You can begin configuring your server here or explore more options in the Control Panel accessible in the same way as it is on regular Windows operating systems.


Step 4. Configure your network on Windows Server 2022

The previous sections covered how to install Windows Server 2022, but now it’s time for configuration. The first things that need configuring on your network are IPs and gateway addresses so that system admins can manage the server remotely and reach other parts of their environments, including internet-based services.

Step 4.1 Network configuration on Windows Server 2022 Server Core

The instructions below will help you configure the network if you installed Windows Server 2022 with a Server Core installation.

  1. To configure the network for Windows Server 2022, run the following command in the Command Prompt area: 

    You'll see a menu open on the screen. Choose option 8 for Network Settings. You'll be taken to your network configuration page, where all of these adjustments are made for both wired and wireless networks!


    To begin configuration, you need to select which IP to configure first. In this example case, we'll choose 1 since our server has only one network connection. Normally, you might see multiple options here — select the one you want to work with first

  1. Once you have selected your IP for configuration, you can begin customizing your settings. The computer's network settings will be automatically updated. The process should take no more than five minutes to complete.

Step 4.2 Network configuration on Windows Server 2022 Desktop Experience

The instructions below will help you configure the network if you install Windows Server 2022 with a desktop experience.

  1. Open the Search interface in your taskbar by clicking on the magnifying glass icon. You can also bring it up with the Windows + S keyboard shortcut.
  2. Type in words Control Panel and click on the first matching search result. When it opens, navigate to Network and Internet > Network Connections.
  3. Right-click on the network you want to configure. We only have one network connection to the server computer in our example; however, you may see many possible options. Pick whichever you want to configure, and choose Properties from the context menu.
  4. You can begin configuring the network connection using the GUI, which resembles Windows 10’s.

your done installing the server now open the domain controller  to confiscation. 


Share:

How To Install & Download Microsoft Office 2016 Without Pictures Tutorials

 Microsoft has said that the final version of Office 2016 for Windows would be released in the last quarter of the year. Since the general availability of Office 2016 is couple of months away from now, many of you might want to explore the new Office suite for desktop right away.

Office 2016 is compatible with Windows 7, Windows 8, Windows 8.1 and Windows 10. In this guide, we will show how you can install Office 2016 Preview on Windows 10. Note that these directions work on Windows 7 and Windows 8/8.1 as well.

Before installing Office 2016

Before beginning to download and install on your PC, please uninstall any previous version of Office from your PC as Office 2016 and previous Office version can’t be installed on the same PC. the installer

At this moment, the offline installer or full setup of Office 2016 is not available. We need to run the downloaded click-to-run installer in order to download installation files and install Office applications.

Step 2: Run the downloaded click-to-run installer to begin downloading required installation files. Once the download is complete, Office 2016 will be automatically installed in the background. During this time, you can continue using other applications without any issues.

OTE: There is no way to change the default download directory while installing Office 2016 Preview. Although the option will be available in the final version or when the offline installer is released, there is no such option in the current preview build.

Once Office 2016 is installed, you’ll see “Installation is finished” message. That’s it!

Step 3: After completing the installation, launch any Office application, enter NKGG6-WBPCC-HXWMY-6DQGJ-CPQVG product key when asked to activate Office 2016 Preview


Share:

Sunday, 22 January 2023

Install WordPress In cPanel Without Pictures Tutorials

WordPress®, a web-based content management system, allows users to easily create a website or blog. This document describes how to install WordPress on your cPanel account.

Note:

The Onboarding Assistant automatically creates a WordPress® website for the new cPanel account if the user selects the WordPress option.

Install WordPress 

Install WordPress from WP Toolkit

In cPanel & WHM version 92 and newer, users can install WordPress through the WP Toolkit interface (cPanel » Tools » Domains » WP Toolkit).

For instructions on how to install WordPress through WP Toolkit, read Plesk’s WP Toolkit documentation.

Install WordPress as Site Software

In cPanel & WHM version 90 and earlier, users can install WordPress as a cPAddon with cPanel’s Site Software interface (cPanel » Home » Software » Site Software).

To install WordPress as a cPAddon, perform the following steps:

  1. Navigate to cPanel’s Site Software interface (cPanel » Home » Software » Site Software).

  2. To receive a notice via email when the hosting provider installs WordPress, click here after the You currently are set to receive a notice when updates for your installs are available text.

  3. Click WordPress.

  4. Enter the requested information.

    • To install WordPress directly into a domain’s document root, leave the installation URL’s path blank. This may overwrite any files already in the document root.
  5. Click Install.

    • If your hosting provider moderates requests for WordPress installation, click Submit Moderation Request.
    • Enter a note for your hosting provider, and click Submit Request.
  6. When the WordPress installation finishes, use your web browser to view the location that you entered in Step 4.

    • For example, if you installed WordPress in the http://example.com/wordpress/ directory, browse to the http://example.com/wordpress/ URL.

If WordPress is not available as a cPAddon, users can ask their hosting provider to add it, or they install WordPress directly themselves. For more information, read the User installs WordPress Manually section below.

Install WordPress Manually

If your hosting provider does not offer WordPress as a cPAddon, you can manually download WordPress from the WordPress website and install it on your site.

For more information, read installation instructions from WordPress and their cPanel-specific instructions on how to create a database for WordPress.

Manual installations may encounter issues due to conflicting .htaccess files or database connection errors:

Note:

In the following examples, the following statements are true:

  • example.com represents the domain name.

  • example represents the account name.

  • subdomain represents a subdomain’s directory.

  • addon.com represents an addon domain name.

Document root issues

Due to potential conflicts in the .htaccess file, do not configure multiple WordPress installations to share a single document root. If you experience difficulties with WordPress, check the following requirements:

  • Each cPanel account user can host only one installation of WordPress in the document root directory.

    • The following are examples of document root directories:

      • /home/example/public_html/
      • /home/example/public_html/addon.com
      • /home/example/public_html/subdomain
    • Each directory may only contain one WordPress installation.

    • If the subdirectories are not a document root, cPanel account users can install additional WordPress installations in subdirectories under the domain’s home/example/public_html directory.

      • The following examples demonstrate installations that use the wordpress subdirectory:

        • Under the document root for the main domain: /home/example/public_html/wordpress

        • Under a subdomain: /home/example/public_html/subdomain/wordpress

        • Under an addon domain: /home/example/public_html/addon.com/wordpress

For more information, visit the WordPress website.

Database connection errors

If WordPress returns a database connection error, ensure that the database’s name and password in the wp-config.php file are identical to the database credentials in your account.

For a document root installation, the wp-config file exists in the /home/username/public_html directory, where username represents the cPanel account name.

To change the database’s username or password, use cPanel’s MySQL Databases interface (cPanel » Home » Databases » MySQL Databases).

To test a username and password combination, run the following command (where db_user represents the database’s authorized username):

Share:

How to Install Moodle Without Pictures Tutorials

 For an automatic installation, users can utilize the installer included in the control panel used by their web hosting provider.

We’ll walk you through the steps of this LMS installation on your web server using hPanel and cPanel.

With Hostinger, you can install the Moodle platform with ease using the already provided one-click installer.

To use hPanel’s one-click installer for Moodle, follow these steps:

  1. Log in to the hPanel.
  2. Click Hosting on the navigation bar, find your domain name, and click the Manage button.
  1. Scroll down to the Website section and click on Auto Installer.
  1. When choosing the CMS to install, click the Select button for Other.
  2. How to install Moodle

    Moodle is an Open Source Course Management System, also known as a Learning Management System (LMS) or a Virtual Learning Environment (VLE). Educators around the world use it for creating dynamic websites for their students. Moodle is easy to install; get started in minutes!

    Please note, the installation of Moodle requires 1 MySQL database.

    Step-by-step installation instructions:

    1. Log in to your HostPapa dashboard: https://www.hostpapa.com/dashboard

    2. Click on My cPanel. If you have more than one domain associated with your HostPapa account, click on the appropriate domain link, then enter your cPanel password if required.

    3. Under Software/Services, select Softaculous.

    4. From the left hand menu, under Educational, select Moodle.

    5. Click the Install button.

    6. You may then configure the Software Setup.

      1. Choose Protocol: If your site has SSL, choose the HTTPS protocol – if not, either HTTP option will work.
      2. Choose Domain: Select the domain on which you wish to install Moodle.
      3. In Directory: Leave this blank to install into the root directory of the above domain name.
        IMPORTANT: If you have other software/scripts installed on this domain’s root directory, make sure you create a new folder and specify its name in this field to complete the installation. If you don’t, you will overwrite existing installations.
      4. Data Directory: This will be pre-populated; you may leave it as is.
      5. Database Name: This will be pre-populated; you may leave it as is.
      6. CRON Job: This will be pre-populated; you may leave it as is.
    1. You may then configure the Site Settings.

      1. Site Name: Choose any name for your new site.
      2. Site Description: Choose a description for your new site.

    2. You may then configure the Database Settings.
      1. Table Prefix: This will be pre-populated; you may leave it as is.

    3. You may then configure the Admin Account.
      1. Admin Username: This is pre-populated; you may leave it as is or choose a new username.
      2. Admin Password: This is pre-populated; you may leave it as is or choose a new password. Ensure you record it for future use.
        IMPORTANT: Choose a secure password to ensure the safety of your account.
      3. First Name: This will be pre-populated; you may leave it as is or enter your first name.
      4. Last Name: This will be pre-populated; you may leave it as is or enter your last name.
      5. Admin Email: This is pre-populated with the admin email associated with your domain name; however we strongly suggest choosing an alternate email that is not associated with your account.
      6. Click the plus sign beside Advanced Options; we strongly suggest that you DO NOT disable email notifications. Keeping your scripts up to date will ensure the security of your account.
      7. Select Language: Choose a language from the dropdown menu.To learn more about website security, please read the following article: https://www.hostpapa.com/knowledgebase/kb/tips-on-how-to-improve-your-website-security/
        To learn more about keeping your scripts up to date, please read the following article: https://www.hostpapa.com/knowledgebase/kb/updating-your-website-tools/For the installation details to be emailed to your cPanel account’s primary email address, leave the Email installation details to field blank. Should you wish to have them sent to another email address, enter it here.
    1. Click Install.

Share:

How Do I Configure FileZilla For Website Publishing With Pictures Tutorials

 Follow these instructions to configure FileZilla so that you can upload (publish) your web documents.

Instructions:

  1. Open FileZilla (usually found in Start > Programs > Internet > FileZilla)
  2. FileZilla will open and present you with a window similar to the following one

  1. Click on the File menu, and select Site Manager.
  2. Click the New Site button, or select an entry to modify the connection details.
  3. Type in your domain name as the site name and press enter.
  4. In the site details, use the following settings:
Host<your provided domain name>
i.e. mysite.ok.ubc,ca, mydomain.com
Port21443
ProtocolFTP - File Transfer Protocol
EncryptionRequire explicit FTP over TLS
Logon TypeNormal
User<your Novell username>
(unless you have been provided a specific FTP user account)
Password<your Novell password>
(unless you have been provided a specific FTP user account password)


  1. Click the OK or Connect button to save your changes.When you connect to the server 
  2. for  .the first time using this new setting you will be prompted with an "Unknown Certificate" window. Please check the "Always trust certificate in future sessions" option and click OK.

  1. That's it! You should now be connected to the FTP server over an SSL encrypted channel, ensuring that your username, password and FTP commands are all secured. If you should run into any difficulties connecting to a server that you know that you should have access to, please contact the IT Helpdesk at 79000.
Share:

Upload Your Site to FileZilla With Pictures Tutorials

 Filezilla can be downloaded free of charge from http://www.filezilla-project.org.

  1. Download the Filezilla software and install it onto your computer.
  2. 1. Open FileZilla (usually found in Start -> Programs -> Internet -> FileZilla)
  3. 2. Click on the File menu, and select Site Manager.
  4. 3. Select your site from the list and click the Connect button. The Site Manager window will close and FileZilla will connect to your website. Your window will now look similar to the one shown below. You’ll know that you’ve connected successfully if you see your domain name listed in the right hand window pane (the area highlighted above in red).


4. You’re now ready to upload documents. First, however, we need to navigate to the appropriate folder on the web site where your documents will be stored. To do this, start by double clicking on your domain name in the right hand pane. This will move inside that folder (ie: change directory) and your view will change to show the contents of that folder.

Most domains have only one subfolder (www) but additional ones may be requested if required.
Here is an example structure to show you how things are laid out

  1. mydomain.com (your parent domain name)
     www (represents www.mydomain.com)
      htmlcontains the files for http://www.mydomain.com
    This is where you must upload files you want to appear at http://www.mydomain.com
      logcontains web server log files for www.mydomain.com
     research (represents research.mydomain.com)
      htmlcontains the files for http://research.mydomain.com
    This is where you must upload files you want to appear at http://research.mydomain.com
      logcontains web server log files for research.mydomain.com

    The html folder in each subfolder represents the contents of that website.  If, for example, you uploaded proposal.doc into the html folder of the www subfolder, it would be available at http://www.mydomain.com/proposal.doc.  If you instead uploaded proposal.doc into the html folder of the research subfolder, it would be available at http://research.mydomain.com/proposal.doc.

    Note that doing this does not create or update web pages, it simply places files on the website. If you need to create or update web pages, you must do that on your machine first and then upload them to your website. Creating and updating web pages is well beyond the scope of this document.
  2. .Keep moving down deeper into the folder structure until you are inside the html folder you wish to upload into. You can verify you are in the correct location by checking the address in the Remote Site field as shown below.

  1. 3. In this example, my site is empty. To upload a file, simply drag it from your computer into the empty space in the right hand pane. Your file will be uploaded and the window will be updated to show your new document.

  2. 4. Should you wish to delete or rename files, simply right click on the file and select Delete or Rename.

Share:

How To Install Clean Windows 11 With Pictures Tutorials


Then, just follow the step-by-step guide like the following to finish installing Windows 11 OS.

1. Specify the language, time, and currency format, as well as keyboard or input method to continue.


2. Click Install now to start installing Win11.


3. Activate Windows. You are required to input your product key to go on. If you don’t have a product key or forget, you can activate Windows 11 later. If so, click I don’t have a product key.


4. Select which edition of Windows 11 you’d like to install, Windows 11 Home, Windows 11 Education, Windows 11 Pro…?


5. Click to accept the Microsoft Software License Terms and click Next to go on.

6. Which type of installation do you want? Just choose one of the below two options according to your own situation.

  • Upgrade: Install Windows and keep files, settings, and applications. The files, settings, and applications are moved to Windows with this option. This option is only available when a supported version of Windows is already running on the computer.
  • Custom: Install Windows only (advanced). The files, settings, and applications aren’t moved to Windows with this option. If you want to make changes to partitions and drives, start the computer using the installation disc. We recommend backing up your files before you continue.

7. Where do you want to install Windows 11? Just pick up a hard disk to continue.


8. Wait patiently until it completes the installation.


9. Then, you need to wait a couple of minutes to allow Windows 11 to starts up. During this period, you will first see Windows 11 logo.


10. Then, you will be invited to customize your Windows 11 settings. First of all, customize your country or region.


Next, choose your Windows 11 keyboard layout and input method.


Decide whether you want a second keyboard layout in Windows 11 or not.


Then, select how would you like to set up this Windows 11 device? Set up for personal use or set up for work or school?


Next, you have to sign in to your Microsoft account to continue.


Create Windows 11 Hello PIN.


Choose Windows 11 privacy settings for your device.


Customize your experience on Windows 11.


Then, another few minutes are needed to boot up Windows 11.

11. Eventually, you will see Windows 11 desktop with a Windows 11 startup menu in the center of the desktop. The concept of the Windows 11 user interface (UI) centralized design is to put users in the center. The below picture is what Windows 11 look like.


After successfully installed Windows 11, you will need to install a couple of Windows 11 software before enjoying this new Windows ecosystem, such as Windows 11 backup software, Windows 11 data recovery software, Windows 11 partition software, Windows 11 movie maker, Windows 11 video editor, etc.

ENJOY YOUR NEW WINDOWS 11 DESKTOP


Share: