 Install Windows Server 2022
 Install Windows Server 2022
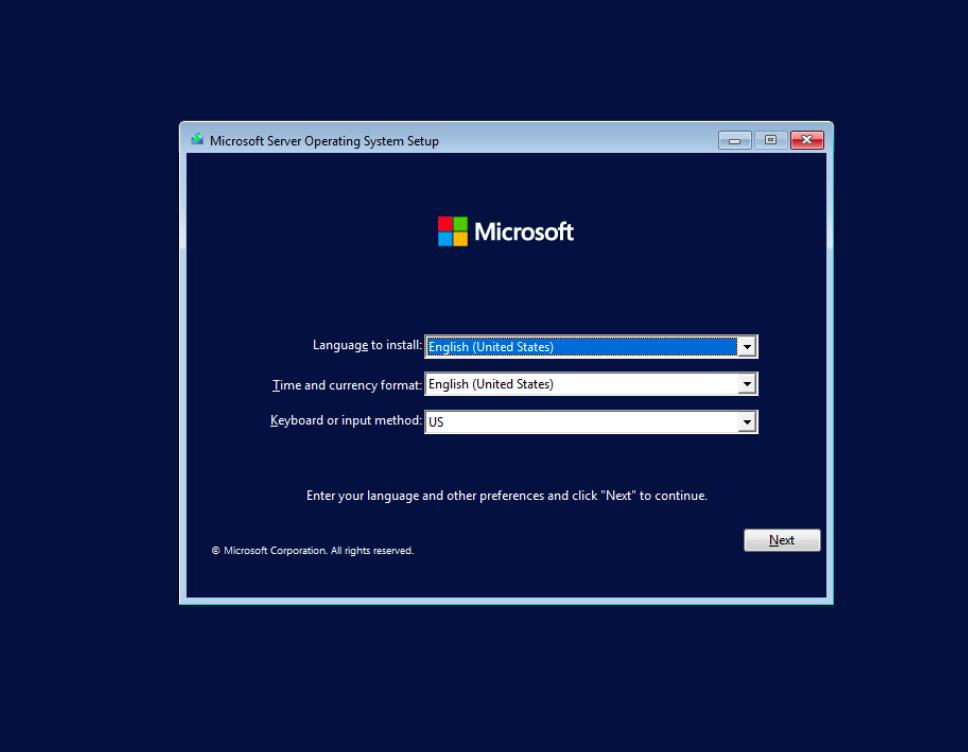
Step 1 In the Microsoft Server Operating System Setup window, choose the language and other preferences, click Next.
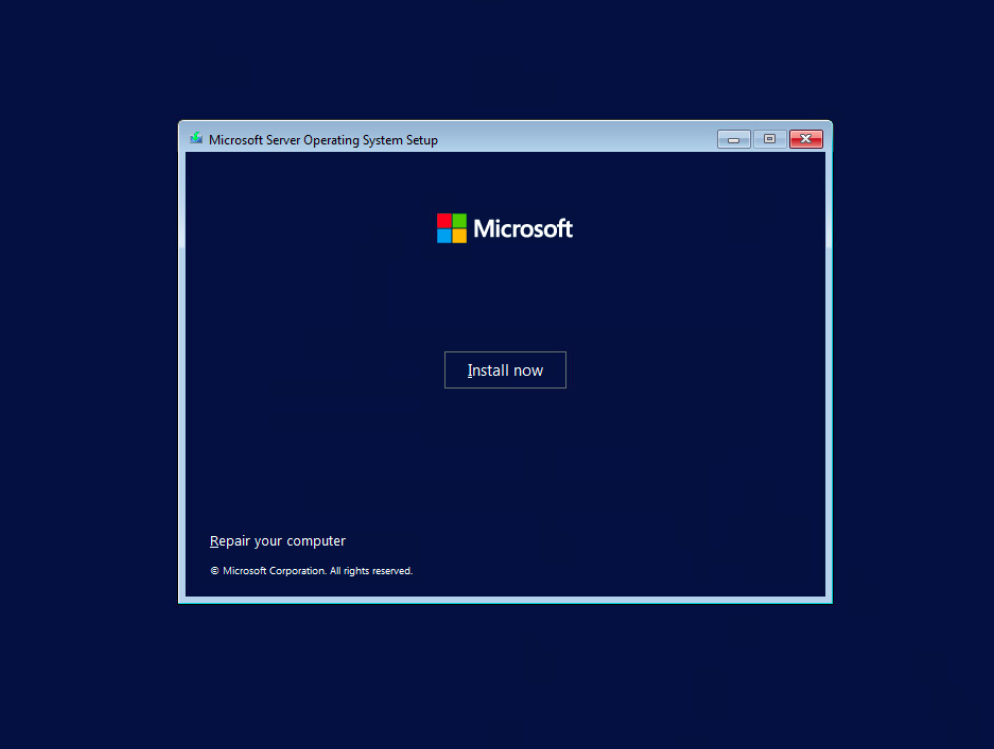
Step 2. Click Install Now to begin the installation process.
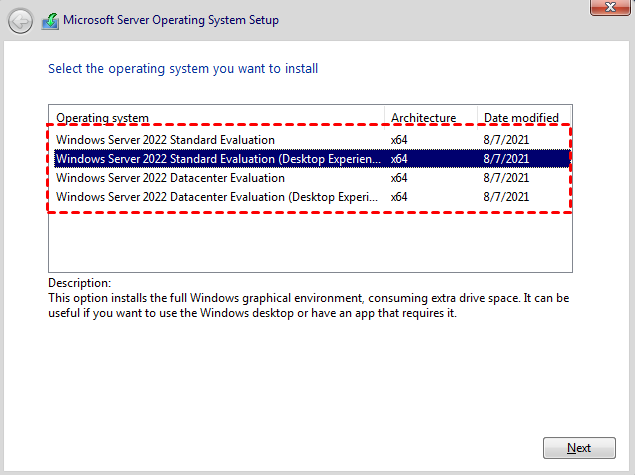
Step 3. Select the operating system you want to install. Here I will choose Windows Server 2022 Standard (Desktop Experience).
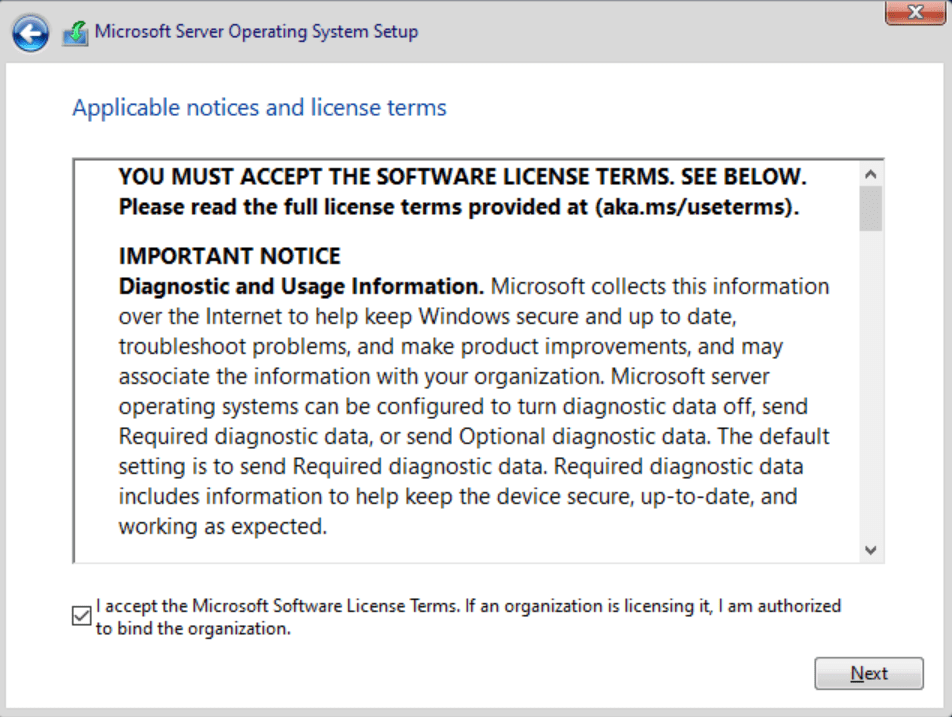
Step 4. Check I accept the license terms and then click Next.
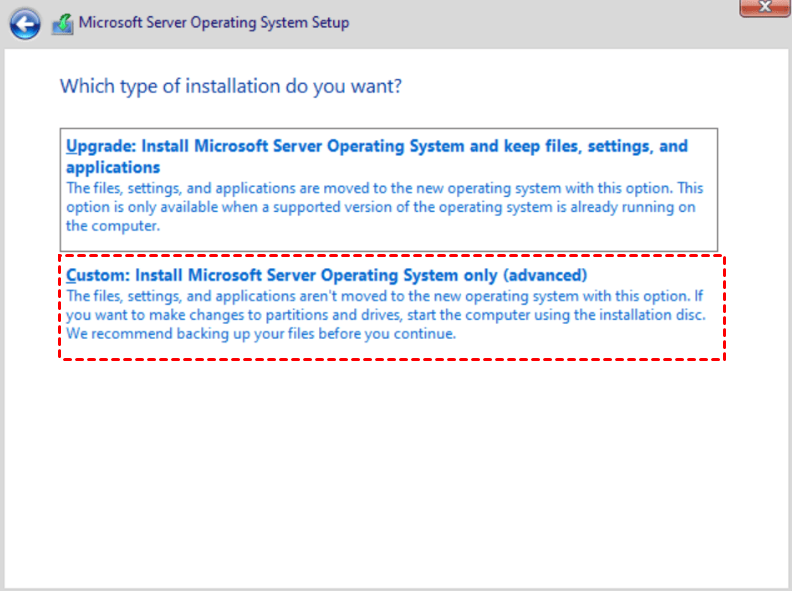
Step 5. Select Custom: Install Windows only (advanced).
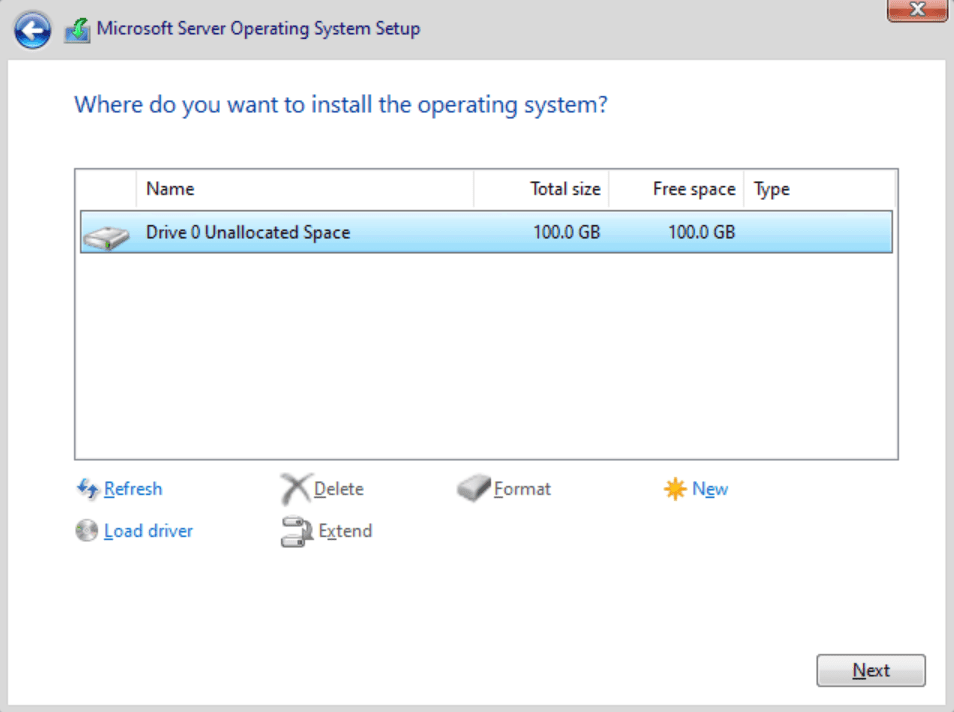
Step 6. Select the hard drive to install Windows Server 2022. Then, click Next.
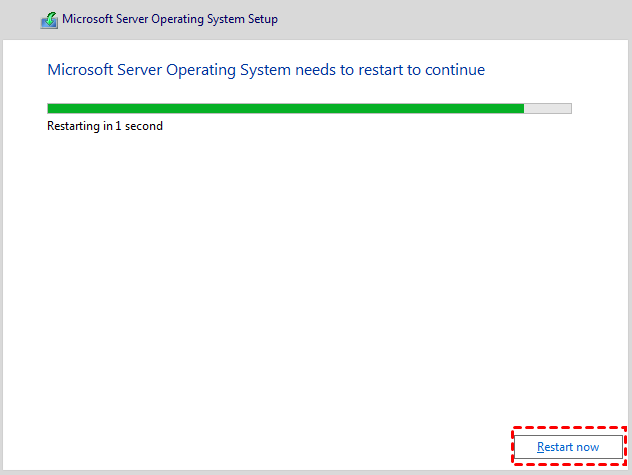
Step 7. Now the installation will begin and can patiently wait for the process. After installation, click Restart now.
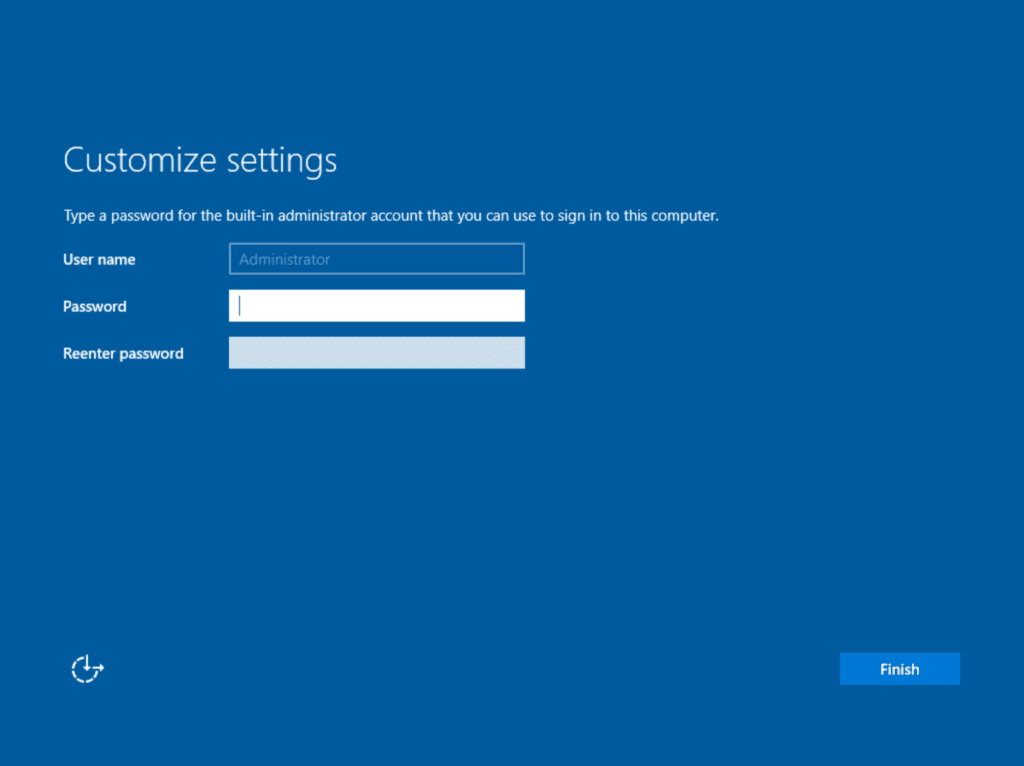
Step 8. Finally, you will be askedd to customize settings before entering Window Server 2022.
Install Windows Server 2022 from USB (No Data Loss)
As mentioned above, the Windows Server 2022 installation guide for VMware and physical machines are exactly the same, except for bootable media and the way to start it.
Besides, there is another thing you need to pay more attention - the VMware relies on the physical machine and you can recreate it even if crashes. But if something bad happens to a physical machine, it will be a little tricky. It's not only the operating system but also programs, files, activation issue, etc. Thus, it's suggested to backup system before installation.
For backup software, if you are a professional, you could consider using AOMEI Backupper Server. But if you are sure you want to use it after testing it on the VMware and deploy system image to multiple computers with one company, try AOMEI Backupper Technician Plus. Both of them apply to Windows Server 2022, 2019, 2016, 2012, 2008, 2003 etc.
How to backup system before installing? First, please download this software and install it on your computer. Then, open this software and follow the steps below.
Step 1. On the main page of AOMEI Backupper, click Backup > System Backup.

Step 2. The related system partitions will be selected by default. Then, you just need to select a destination path, you have 3 options in the following. Consider the data security, it's suggested to backup Windows Server 2022 to USB drive, external hard drive(HDD or SSD), network drive or NAS, etc.
- Select a local path: It allows you to backup ssytem to an internal or external drive, USB thumb drive. Note you need to insert them and be sure it's recognized.
- Add Share or NAS Device: It is capable of adding network location or NAS device as long as you know its IP address and has the access priority.
- Select a cloud drive: It is able to backup system to any cloud drive if you install it on your computer. All of them will be listed in the Select Cloud window.
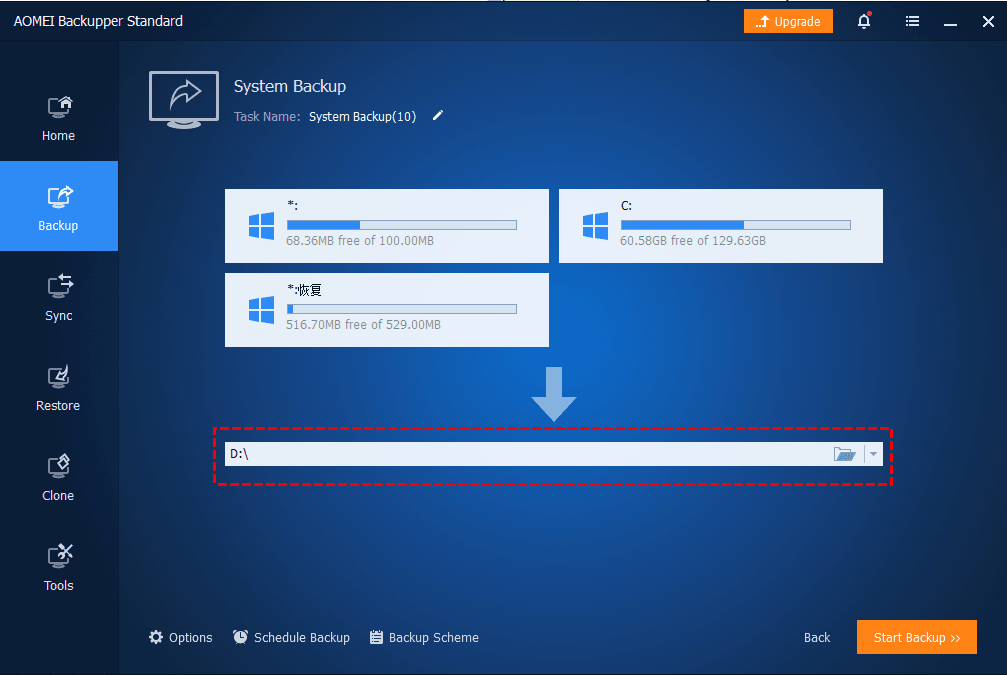
Step 3. Confirm your operations and click Start Backup.
Then, you can install Windows Server 2022 from USB without any worries.
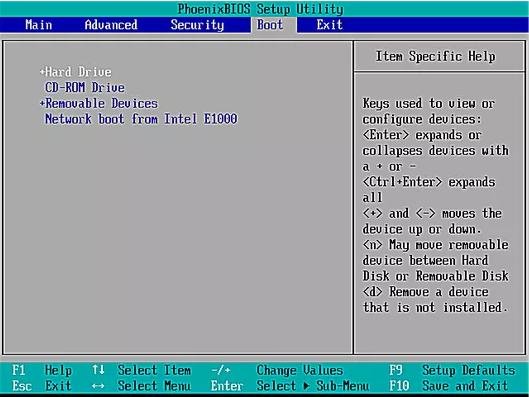
- Insert the installation USB for Server 2022. Restart your computer and press a specific key (eg: ESC, F2, F10) to access BIOS.
- Then, expand the Removable Devices and select the USB drive, move it to the first boot option.
- Finally, press F10 to save your changes and boot from it.
- Follow Step 3 - Step 10 of installing Windows Server 2022 on VMware. The steps are exactly the same.
After installing, you may encounter the following two main situations. You can go back or improve the data security for it.
>> If you are not used to or do not like the latest Server 2022 after testing or running this system for several days, you still can restore your computer to an earlier date easily
>> If you want to continue using it, you need to do a good job for long-term computer and data protection, which is the ultimate goal of data protection. You can still use AOMEI Backupper Server to help you, and you will be benefit from the following features:
👍 Schedul Backup: It offers you 5 options, including daily, weekly, monthly, event trigger and USB plug in.
The previous three options allows you to backup system in different frequencies, but if you want to backup it to USB or external drive, you need to always connect it. If you don't want to do so, try USB plug in feature, which resolve this issue completely.

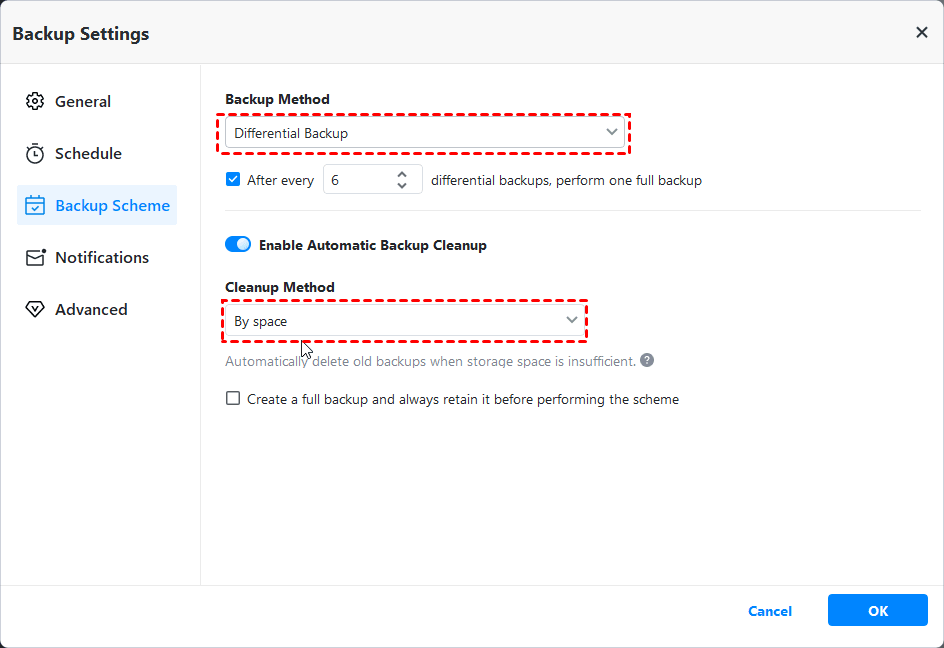
👍 Backup Scheme: It is mainly consist of 3 backup methods and 3 cleanup methods.
√ For backup method, it's suggested to use incremental or differential backup, which backup only changed files.
√ For cleanup method, you can select one of them, then it will delete old backup images to free up disk space for new backups.
Install Windows Server 2022 latest updates
Before you start to test this new operating system or experience it, you still need to install the lastest updates for security fixes, bug fixes, and any new features.
Step 1. Click Start > Settings and select Update and Security.
Step 2. Then click Check for Updates to scan for new updates.
Step 3. Select the one you want to install and click Install Now to begin the installation of updates.


:max_bytes(150000):strip_icc():format(webp)/WelcometoMyNortonaccountpage-2f1904225c6f4a898fe1b9cd783721b3.jpg)
:max_bytes(150000):strip_icc():format(webp)/EnteryouremailaddressandpasswordandselectSignIn-a17bd466c5ba4be2acec152c7c8ef36c.jpg)
:max_bytes(150000):strip_icc():format(webp)/norton-download-page-5c8fd9a446e0fb00014a9751.jpg)
:max_bytes(150000):strip_icc():format(webp)/001-install-norton-antivirus-4589383-1668dcbd204747d58a0ff0d7f4092665.jpg)
:max_bytes(150000):strip_icc():format(webp)/nortonfiledownload-5c8fdaadc9e77c0001eb1c82.jpg)
:max_bytes(150000):strip_icc():format(webp)/norton-download-page-5c8fd9bd46e0fb00017700f3.jpg)
:max_bytes(150000):strip_icc():format(webp)/NortonmacOSinstaller-3881d7cee1d149f492262928ab33eac5.jpg)
:max_bytes(150000):strip_icc():format(webp)/NortonInstallerhelper-fc84b6090b954c98b36b6c3f20dc81c3.jpg)
:max_bytes(150000):strip_icc():format(webp)/Systemextensionblockedalert-17159f8164fb4bc58af2c553a21aada2.jpg)
:max_bytes(150000):strip_icc():format(webp)/002-install-norton-antivirus-4589383-9b082c6681d44bfd8eddede13d3c1ff9.jpg)
:max_bytes(150000):strip_icc():format(webp)/003-install-norton-antivirus-4589383-1800207dad3f4a4eb153e90e4bf3366b.jpg)
:max_bytes(150000):strip_icc():format(webp)/004-install-norton-antivirus-4589383-04bf63f934384b8abf36111ac8841e2c.jpg)
